Sending a new message
To send a new message, just click on the "New" icon on the top tool bar. A new browser window will then appear to allow you to compose and send the message.
 
  • To - Here, type in the recipient's email address, or choose an email address from your Address Book or Recent Addresses (using the Address icon on the top tool bar). The "To": field must be completed before sending the message.
  • Reply to - This is the address that the recipient will use when replying to your message. This field shows your email addresses.
  • CC (Carbon Copy) - Use this field to send a copy of the message to one or more email addresses. Please note that each recipient of a carbon copy will be able to see the other email addresses in the To and CC fields.
  • BCC (Blind Carbon Copy) - This field is very similar to CC, but the e-mail addresses of those in the BCC field will not be seen by other recipients. BCC is used to confidentially copy recipients on a message.
  • Attached - This field shows if there are attachments with this message.
  • Subject - In this field, type in a brief description of the message. This should give an indication of what the message is about.
  • Priority - If your message is an urgent one, you can set the priority to urgent by using the drop down box. Please note that this is merely an indicator for the recipients, and does not send the message any faster.
  • Signature - You can choose to include one of your signatures at the bottom of your message, using the drop down box.
  • Content/Type - This lets you select the type of message you are sending. For plain text messages use "Plain Text". For HTML messages use "text/html"
  • Keep Copies - Tick this check box if you would like a copy of this message to be kept in your Sent Items folder.
  • Request Confirm - This allows you to request a confimation that the person you have sent the message to has opened your message (Note: this does not guarantee that they have read your message, just that they have opened it).
  • Clear - Use the clear buttonto clear the contents of the selected field.
Address book
Instead of manually typing the email addresses in the To, CC and BCC fields, you can also choose to select them from your Address Book or Recent Addresses.
 
Just click on the "Addresses" icon of your new message and choose which addresses you would like to send the e-mail to, and which fields you would like them to appear in.


Firstly, select an email address from either Address Book or Recent Addresses, and then click on either To, CC or BCC, depending on which field you would like the address appear in.
 
Once you have finished selecting your addresses, click on the "Done" button. This will take you back to your message.
 
Alternatively, you can click on the "Clear" button to clear the To, CC and BCC fields. This is also the only way of removing addresses from these fields within this screen/form. If you would like to remove one or more addresses but NOT all, you will have to click on the Done button and do it in the new message window.
Spelling
Once you have completed composing your e-mail, you can click on the Spelling icon to have your message checked for any spelling mistakes. This will bring you to a screen as shown below.

 
The spelling function only checks for spelling mistakes in the body text of your new message.


The left panel of the window tells you how many spelling mistakes or words that are not in the dictionary. The right panel shows the message body text with the misspelled words highlighted / linked. The bottom panel shows the message body.
 
To correct the words that have been misspelled, just click on them in the right window panel. This will take you to the 'Correct Word' screen. In here, you can select one of the possible suggestions presented to you. When you have selected a word, this word will be placed in the 'Change Word' field, click on 'Change' to have your misspelled word changed to this. This will take you back to the previous screen and you will notice that the misspelled word has been changed to your chosen selection. Please note that not all words will have suggested corrections.
 
You can change the word manually by editing it in the 'Change Word' field and clicking on the Change button.


However, if the word is not misspelled but is not in the WebMail dictionary, click on the Add button to add it to your personal dictionary.
 
Alternatively, you can manually add words to your personal dictionary by clicking on the Edit Dictionary button shown below.


This will take you to your Edit Personal Dictionary screen.


Here you can type in any word that you would like to add to this list. Just type in the word in the 'Add New Word' field and click the Save button. To delete a word from the list, just select a word and click on the 'Delete Selected' button.
 
When you are finished, click on the Done button.
 
Attaching files
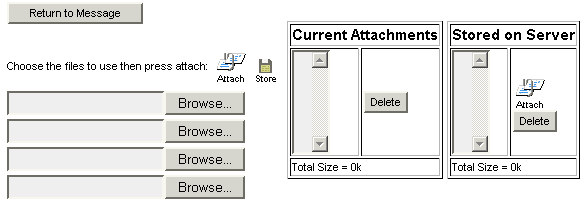
To attach files to your message such as documents or pictures, click on the "Attach" icon. This will take you to the Manage Attachments screen.


Click on the Browse button to browse to the location of the file that you would like to attach. Once you have located the file, select the file, then click on the 'Add' button to attach the file to the message.
 
When the file is successfully attached, it will appear in the Current Attachments list. The size of the file will also be indicated in brackets beside the filename.
 
You can attach more than one file to the message. As more files are selected, the total size of your attachments will be displayed at the bottom of the 'Current Attachments' list.
 
To remove an attached file, select the file and click on the Delete button.
 
To store a file on the server (to save you uploading each time you send it), click on Store button. If you want to attach a file Stored on Server, in your current message, select file from the 'Stored on Server' list, click on the attach icon to the right and it will appear in 'Current Attachments'. Stored files will remain on Server until you delete them.
 
Once you have finished attaching all of your files, click on RETURN TO MESSAGE to finish composing your message, or to send it.
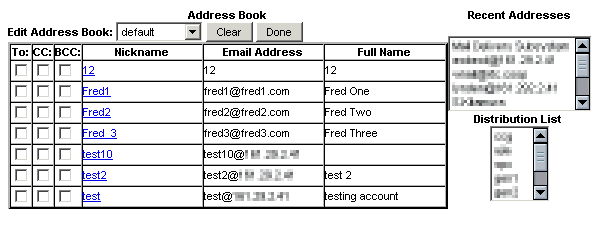
Send Message
Once you have finished composing your EMail message, click on 'Send' to send your message.
Styletext Window
You can compose your message in an alternative window.


The StyleText window's toolbar lets you easily add more styles to your message. You can add color to your text or background, use different fonts, make tables, insert links, align text, and more. Use the tools to design your message the way you want it to look.
 
You can click on the Plaintext icon 
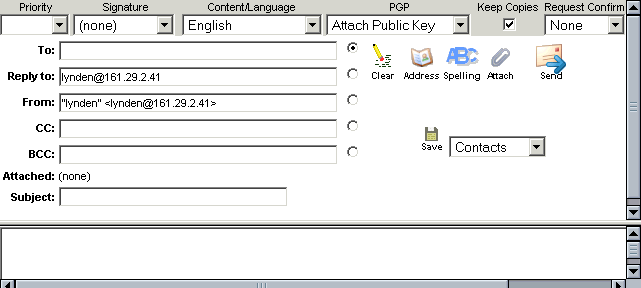
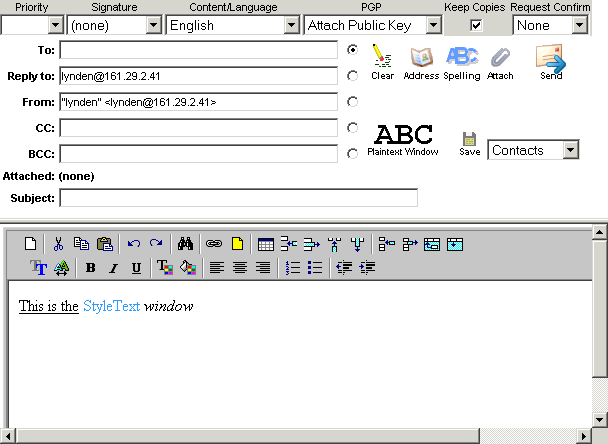
to return to the simple email screen.
 
Save Message
Save EMails that you plan to use over and over again, or those which you do not have time to finish. Saving the message will store the message as a draft on the Mail Server until you are ready to send it. You need to select a folder from the droplist to store the draft message in.