 |
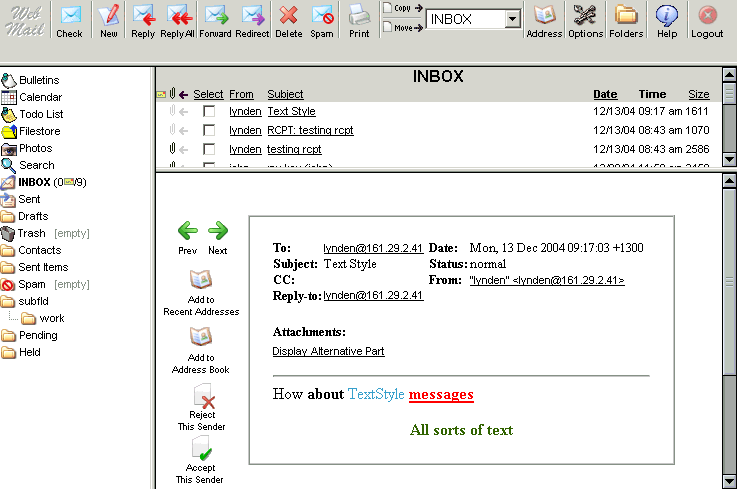
This deletes all the messages from your Trash folder. |
 |
This will download any new EMail you have received since you logged in and will
return you to the Inbox.
|
 |
This opens the "New EMail Message" window. |
 |
To reply to the message, select a message and then click on the Reply icon. You can
then compose and send your message.
|
 |
To reply to all of the recipients of a message, click on the Reply All icon.
This replies to all the people in the To: and Cc: fields in the message currently
being viewed.
|
 |
This will send the message on to a new address, using your address as the from and
reply-to address. Either type in the email address of the person or people you would
like to forward to, or choose from the 'Address Book' and/or 'Recent Addresses'.
|
 |
This will send the message on to a new address and will keep the original from and
reply-to address.
|
 |
This will delete the selected message(s). |
 |
To print a message, click on the Print icon. |


|
Select the destination folder, then click "Move" to move the selected message(s),
or 'Copy' to create a copy in the selected folder.
|
 |
This will open your address book for editing. |
 |
This will open your options page so you can customize your WebMail. |
 |
This will open the folders page. Here you can create, delete and edit folders,
and also check the number and size of messages held in each folder. |
 |
This will open the User Manual in a new window. |
 |
This will end your WebMail session. |
 |
This will take you to your Bulletins folder so you can view messages
broadcast by the admin.
|
 |
This will take you to your Todo list. Reminder messages can be stored here. |
 |
This will take you to the search page so you can easily search
through your messages. For more details,see 'Search' under 'Reading Messages'.
|
 |
This will take you to your inbox folder.This folder cannot be deleted.
(Note: this will not check for new messages)
|
 |
Personal Folders. These will take you to the folders you have created
yourself using the folders page.
|
 |
Drafts. This folder is for draft messages and cannot be deleted |
 |
Spam. This folder is for spam messages and are flagged as spam |
 |
Sent Items. This will take you to your sent messages or outbox folder |
 |
This will take you to your Trash folder. Delete messages from other folders
and they will be in here until you 'Empty Trash'
|
 |
This will view the previous message in the list |
 |
This will view the next message in the list |
 |
This will add the address of the person who sent this message to your recent addresses list.
A confirmation message will appear when the address is successfully saved.
|
 |
This will take you to the Add Addresses screen. The 'Full Name' and 'EMail' fields will be
filled out. Add a Nickname and any other details you wish to keep, then click "Add Address'
to save.
|
 |
This will delete this message and automatically delete all messages you recieve
from this person in the future. Use this feature carefully!
|
|
If you would like to change your message viewing options, check one or more of the following,
then click, 'Set View".
- Raw - This forces the body of the message to be display as it is is stored on the IMAP or POP server.
- Headers - This forces the complete headers of the E-Mail to be displayed.
- Variable width font - This will display the body of the message in a variable width font instead
of a fixed width font.
- Inline images - This will display common types of image file attachments in the body of the message.
- Enable attached scripts etc. - When viewing HTML inline, WebMail, for security reasons automatically
removes scripts, forms and applets. Checking this box will stop these from being removed. This
setting, unlike the others, will not be saved and you need to check this each time you want to
see the script, forms and applets.
- Show both 'alternative' parts - This will make WebMail display both the plain text and the HTML
parts of a multi-part message.
|


